 |
| 1956 Fender Stratocaster |
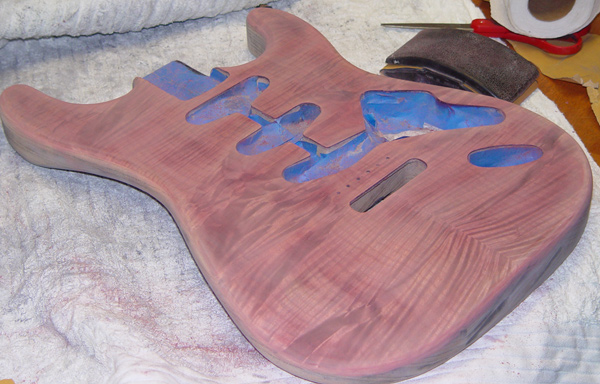 |
| Sand the body to remove sunburst finish |
I suggest routing out the bridge pickup area to accommodate the Hello Kitty® humbucking pickup. You may want to get some wood filler or Bondo™ fiberglass filler to fill in those routed sections of the body. Then sand it again until the surface is smooth.
 |
| 1956 Fender Stratocaster Neck |
Then get some #0000 sand paper and scrape out the remnants. Fortunately in our modern times there is a readily available substance called polymer clay, which is available at hobby shops. Get some that is already colored pink. You can even get it at most Walmart stores, Michaels, or Hobby Lobby stores.
 |
| There Are Your Pink Fret Markers. |
Shape the pink polymer clay into tiny flat buttons. You can air-dry these, or put them in an oven and bake them for 15 minutes. Once cooled, put a dab of glue on the back of your pink buttons and place them in the routed area of the neck. You will have to do some further sanding, but it will look great.
 |
| Mambo Pink Kryon Spray Paint. |
Next, get a couple cans of Mambo Pink acryllic spray paint. Krylon® glossy ought to do the trick. Hang the body up and spray it until it looks good. Repeat this step eight, or nine times until you have a shell-like look on the body of your Hello Kitty® guitar.
 |
| Pre-assembled Hello Kitty pickguard, pickup, and adjustable bridge/saddle |
There are a number of companies that supply guitar parts, such as Musician's Pal, and Guitar Parts-R-Us where you can get a pre-wired Hello Kitty® pickguard. Buy one. But, don't ditch those old original parts. Some folks love the sound of vintage pickups hand wound by Abigail Ybarra, so you can sell them on eBay, along with the old wiring harness, and potentiometers for a lot of money.
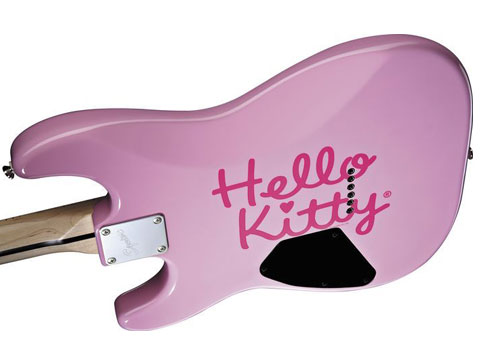 |
| Back of Your Hello Kitty Stratocaster |
Now for the final touch, get a Shocking Pink Sharpie permanent marker and in your best cursive hand, write Hello Kitty on the back of the body. Better yet, get your girlfriend or wife to do this step. Girls seem to be able to do that flowery cursive script, better than guys. And if you are a lady, then you got this step!
 |
| Your Finished Hello Kitty Stratocaster |
 |
| Making a Vintage Martin D-28 into a Hello Kitty Acoustic Guitar |
Next week, we will learn how to take a Pre-war Martin D-28 and turn it into a Hello Kitty® acoustic guitar.
©UniqueGuitar Publications 2020 (text only)
By the way, it's April Fools Day!


3 comments:
I thought "WTF", then check the post date, phew !
ucuz güvenilir instagram takipçi satın alma.
That's nice. It was a fine article.
Fa Chai
Post a Comment